This standard is issued under the fixed designation A228/A228M; the number immediately following the designation indicates the year of original adoption or, in the case of revision, the year of last revision. A number in parentheses indicates the year of last reapproval. A superscript epsilon (E) indicates an editorial change since the last revision or reapproval.
This standard has been approved for use by agencies of the U.S. Department of Defense.
1 Scope
1.1 This specification covers a high quality, round, cold-drawn steel music spring quality wire, uniform in mechanical properties, intended especially for the manufacture of springs subject to high stresses or requiring good fatigue properties.
1.2 The values stated in either SI units or inch-pound units are to be regarded separately as standard. The values stated in each system may not be exact equivalents; therefore, each system shall be used independently of the other. Combining values from the two systems may result in non-conformance with the standard.
2 Referenced Documents
2.1 ASTM Standards:
A370 Test Methods and Definitions for Mechanical Testing of Steel Products
A5 10/A.5 10M Specification for General Requirements for Wire Rods and Coarse Round Wire, Carbon Steel
A700 Guide for Packaging, Marking, and Loading Methods for Steel Products for Shipment
A751 Test Methods, Practices, and Terminology for Chemical Analysis of Steel Products
A938 Test Method for Torsion Testing of Wire
A941 Terminology Relating to Steel, Stainless Steel, Related Alloys, and Ferroalloys
E29 Practice for Using Significant Digits in Test Data to Determine Conformance with Specifications
E1077 Test Methods for Estimating the Depth of Decarburization of Steel Specimens
2.2 Federal Standard:
Fed. Std. No. 123, Marking for Shipment (Civil Agencies)
2.3 American National Standard:
B32.4 Preferred Metric Sizes for Round, Square, Rectangle, and Hexagon Metal Products
2.4 AIAG Standard:
AIAG B-5 02.00 Primary Metals Identification Tag Application Standard
3 Terminology
3.1 Definitions- For definitions of terms used in this specification, refer to Terminology A941.
4 Ordering Information
4.1 Orders for steel wire under this specification shall contain the following information:
4.1.1 Quantity (weight in lbs, or mass in kg),
4.1.2 Name of material (music steel spring wire),
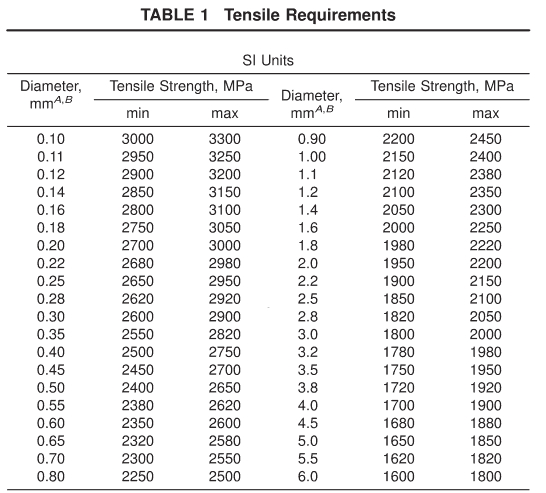
4.1.3 Diameter (Table I and Section 9),
4.1.4 Finish (see 10.2),
4.1.5 Packaging (Section 15), and
4.1.6 ASTM designation and year of issue.
4.2 The purchaser shall have the option to specify additional requirements, including but not limited to:
4.2.1 Requirements for certifications, heat, or test reports, (see Section 14),
4.2.2 Special packing, marking, and loading requirements (see Section 15), and
4.2.3 Other special requirements, if any,
NoTE 1- -A typical inch-pound units ordering description is as follows: 10 000 Ib Music Steel Spring Wire, 0.055 in. diameter, phosphate coated in 1000 Ib coils to ASTM A228M dated______, or for metric units, 5000 kg Music Steel Spring Wire, 1.40 mm diameter, phosphate coated in 500 kg coils to ASTM A288 dated____.


5 Materials and Manufacture
5.1 The steel may be made by any commercially accepted steel-making process. The rod to be used in the manufacture of wire furnished to this specification shall be in accordance with Specification A5 10/A510M.
5.2 The finished wire shall be free from detrimental pipe and undue segregation.
5.3 The wire shall be cold drawn to produce the desired mechanical properties.
6 Chemical Composition
6.1 The steel shall conform to the requirements for chemical composition prescribed in Table 2.
6.2 Heat Analysis- Each heat of steel shall be analyzed by the manufacturer to determine the percentage of elements prescribed in Table 2. This analysis shall be made from a test specimen preferably taken during the pouring of the heat. When requested in the purchase order, the heat analysis shall be reported to the purchaser.
6.3 Product Analysis- An analysis may be made by the purchaser from finished wire representing each heat of steel. The chemical composition thus determined, as to elements required or restricted, shall conform to the product analysis requirements specified in Table 7 of Specification A510/A510M.
6.4 For referee purposes, Test Methods, Practices, and Terminology A751 shall be used.
7 Mechanical Properties
7.1 Tension Test:
7.1.1 Requirements- -The material as represented by tension test specimens shall conform to the requirements prescribed in Table I.
7.1.2 Number of Tests- One test specimen shall be taken from the top or outside end of each coil, reel, or spool, and shall be tested for conformance.
7.1.3 Test Method- The tension test shall be made in accordance with Test Methods and Definitions A370.
7.1.4 For wire diameters over 0.283 in. [7.2 mm], mechanical properties shall be negotiated between purchaser and supplier and shall be included on the order information.
7.2 Wrap Test:
7.2.1 Requirements- -The material shall conform to the requirements prescribed in Table 3. The requirement for conformance to wrap test on wires above 0.283 in. [7.2 mm] in diameter shall be agreed upon between purchaser and producer.
7.2.2 Number of Tes1s- One test specimen shall be taken from the top or outside end of each coil, reel or spool and shall be tested for conformance.
7.2.3 Test Method- Each test specimen shall be closed wound on an arbor as prescribed in Table 3 for a minimum of four full wraps. Wire so tested shall not show any splits or fractures.

7.3 Torsion Test:
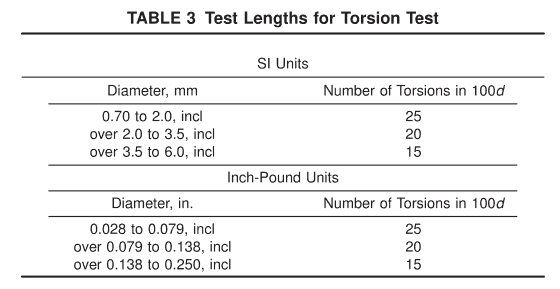
7.3.1 Requirements- -The torsion test shall be applied to wire sizes 0.70 mm [0.028 in.] and larger in diameter. For wire sizes smaller in diameter than 0.70 mm [0.028 in.], the torsion test may be substituted for the wrap test (7.2). In this case, the minimum number of torsions to failure will be equivalent to 25 in a test length of 100d.
7.3.2 Number of tests- One test specimen shall be taken from the top or outside end of each coil, reel, or spool and shall be tested for conformance.
7.3.3 Test Method- -Test specimens shall be prepared and tested as shown in A938 with the following exception. The minimum number of torsions (twists) to failure in a test length of 100d (where d = the wire diameter being tested) are shown in Table 4.

7.3.4 Following completion of the torsion test, the torsion fracture shall be perpendicular to the longitudinal axis of the test specimen and the surface of the test specimen shall not be split. Secondary (recoil) fractures shall be ignored.
7.3.5 Test lengths other than 100d may be utilized. In this case, the minimum number of torsions to failure shall be adjusted in direct proportion to the change in test length as
determined by the following formula:
Tx=(Td*Lx)/Ld
Tx= minimum number of torsions for new test length,
Td = minimum number of torsions for 100d test length,
Lx = new test length, and
Ld = 100d test length
7.3.6 For wire diameters over 0.283 in. [7.2 mm], the requirement for torsion testing shall be negotiated between purchaser and supplier and shall be included on the order information.
8 Metallurgical Requirements
8.1 Surface Condition:
8.1.1 The surface of the wire as-received shall be free of rust, excessive scale, die marks, pits, and scratches detrimental to the end application. Seams shall not exceed 2 % of the wire diameter or 0.15 mm [0.006 in.], whichever is less.
8.1.2 Location of Test- Test specimens shall be taken from either or both ends of the coil.
8.2 Decarburization:
8.2.1 The maximum affected depth of decarburization shall not exceed 2 % of the wire diameter or 0.15 mm [0.006 in.], whichever is less. The maximum average partial decarburization depth shall not exceed 1.5% of the wire diameter when measured using the test method described in 8.2.3.
8.2.2 Test Method- _Decarburization shall be determined by etching a suitably polished transverse section of wire with nital. The entire periphery to be examined should be in a single plane with no edge rounding. (See Test Method E1077.)
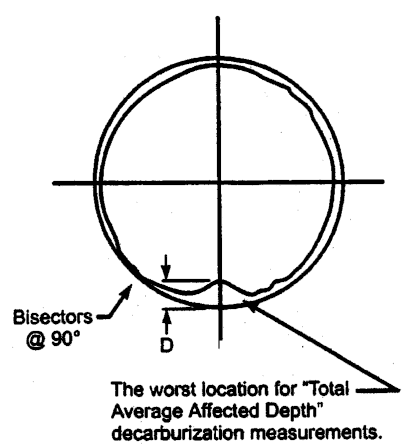
8.2.3 The entire periphery shall be examined at a magnification of no less than 100x for depth of free ferrite and maximum affected depth. Smaller wire sizes may require higher magnification. Complete decarburization exists when only free ferrite is present. The worst case location shall be used to position perpendicular bisectors as shown in Fig. I. The depth of decarburization (D) shall be measured at each of the four points where the perpendicular bisectors cross the circumference of the wire.
he four readings so obtained shall be averaged, and the average shall not exceed 1.5% of the wire diameter.

8.2.4 The purchaser may specify more restrictive decarburization requirements where necessary for special applications. These requirements shall be negotiated between the purchaser and supplier and must be included in the order information.
8.2.5 There are no decarburization requirements for wire sizes smaller in diameter than 2.0 mm [0.078 in].
9 Dimensions and Permissible Variations
9.1 The permissible variations in the diameter of the wire shall be as specifed in Table 5.
10 Workmanship, Finish, and Appearance
10.1 Workmanship- -The wire shall not be kinked or improperly cast. To test for cast, one convolution of wire shall be cut from the coil, reel, or spool and placed on a fat surface. The wire shall not spring up nor show a wavy condition. Wire below 4.0 mm or 0.156 in. diameter shall lie fat while wire diameters larger than the above shall lie substantially flat.
10.1.1 Each coil, reel, or spool shall be one continuous length of wire, properly coiled and firmly tied.
10.1.2 Welds made prior to cold drawing are permitted. If unmarked welds are unacceptable to the purchaser, special arrangements should be made with the manufacturer at the time of purchase.
10.2 Finish- Music wire is supplied with many different types of finish such as bright, phosphate, tin, and others. Finish desired should be specified on purchase orders.
11 Retests
11.1 If any test specimen exhibits obvious defects or shows the presence of a weld, it shall be discarded and another specimen substituted.
12 Inspection
12.1 Unless otherwise specified in the contract or purchase order, the manufacturer is responsible for the performance of all inspection and test requirements specified in this specification. Except as otherwise specifed in the contract or purchase order, the manufacturer may use his own or any other suitable facilities for the performance of the inspection and test requirements unless disapproved by the purchaser at the time the order is placed. The purchaser shall have the right to perform any of the inspections and tests set forth in this specification when such inspections and tests are deemed necessary to assure that the material conforms to prescribed requirements.
13 Rejection and Rehearing
13.1 Unless otherwise specified, any rejection based on tests made in accordance with these specifications shall be reported to the manufacturer as soon as possible so that an investigation may be initiated.
13.2 The material shall be adequately protected and identified correctly for the manufacturer to make a proper investigation.
14 Certification
14.1 When specified in the purchase order or contract, a producer’ s or supplier’s certification shall be furnished to the purchaser that the material was manufactured, sampled, tested, and inspected in accordance with this specification and has been found to meet the requirements. When specified in the purchase order or contract, a report of the test results shall be furnished.
14.2 The certification shall include the specification number, year date of issue, and revision letter, if any.
15 Packaging, Marking, and Loading for Shipment
15.1 The coil, reel or spool mass, dimensions, and the method of packaging shall be agreed upon between the manufacturer and purchaser.
15.2 A tag shall be attached securely to each coil of wire with identifying information as agreed upon by the purchaser and manufacturer.
15.3 Unless otherwise specifed in the purchaser’s order, packaging, marking, and loading for shipments shall be in accordance with those procedures recommended by Practices A700.
15.4 For Government Procurement:
15.4.1 Marking for shipment of material for civil agencies shall be in accordance with Fed. Std No. 123.
15.5 Bar Coding- In addition to the previously-stated iden- tification requirements, bar coding is acceptable as a supplementary identification method. Bar coding should be consistent with AIAG Standard 02.00, Primary Metals Identification Tag Application. The bar code may be applied to a substantially affixed tag.
16 Keywords
16.1 music spring; wire
